Using Openbox as a Tiling Window Manager
Advantages
I’ve been satisfied with pure tiling window managers for the past decade, but I recently used Openbox on a friends machine and I’ve instantly realized that it was a better way.
I’m not ready to give up on the benefits of tiling entirely however and I’ve tried to setup my workstation as a hybrid tiling/stacking setup which I’ve described below.
What is Openbox?
Openbox is a stacking window manager that comes as part of the LXDE desktop.
In contrast to widely-used lightweight tiling window managers, LXDE comes ’opinionated’ with a traditional menu and generally adheres to the desktop metaphor found on OSX and Windows.
Openbox is primarily configured with an XML file that dictates both keyboard and mouse bindings, while also allowing you to control window decoration, defaults, etc.
Menu
Many larger Linux applications introduce a way to start their programs into a “start menu”, categorized by application ’type’. Menus eliminate the problem of unknown unknowns - programs you’ve once installed but forgotten or came included with another program you installed.
If you use a distribution which frequently integrates the newest changes in Linux, sometimes you can miss new tooling if you don’t have a menu which lists all the installed graphical applications on your system. As a matter of using Openbox, I found out that the firewall I’ve been configuring through a CLI for years has an extremely sophisticated GUI - found through a menu entry.
Applets
It’s possible to get a bar in any tiling window manager, but I’m partial to
lxpanel.

LXDE has gone to considerable lengths to preserve some degree of
compatibility with the interface guidelines and standards set forth by
organizations like the GNOME Project, which means you no longer need to get
inside of your xinitrc to start up the appropriate services.
Which brings me to the final point.
It’s Complicated
From abrt to libnotify, there’s a lot of stuff under the hood of a modern
desktop.
If you want to go the “lightweight” route, you’ve got to prepare yourself
for quite a bit. You’ll need to install and configure a notification daemon,
you’ll need to make sure to start NetworkManager, abrt. You’ll need to test
to make sure that secon notifications are getting triggered in the event
that SELinux wants to let you know something is amiss. You’ll need to have
keybindings for handling 🔊 and 🔇, not to mention the host of other
specialized keys on a modern keyboard. Using existing tooling from a
configuration panel like gnome-control-center will occassionally fail for
important pieces of your system like monitors and bluetooth.
Yes, you can write the dunst configuration, you can use xrandr, configure
your keys, write the unit file to accommodate gnome-keyring-daemon, along with
the shell protocol. You can dive through poorly documented code that doesn’t really
contain any special insights into computers.
There’s something vaguely neat about learning the details of all this. I did
it and I have a large dotfiles repo that bears witness to this vast network
of rc files, $XDG_CONFIG and shell scripts I’ve assembled over the past
decade.
I’m ready for another way however.
The Setup
If you want to directly use my configuration, you can find my openbox configuration here
I use the symbol “🗔” below to mean Super (also known as the ’Windows’ key).
Desktops
LXDE includes the concept of a desktop, a workspace that isolates the windows from each other.
I maintain 8 desktops, each bound to one of the keys above the home row, with
the final p key used to invoke dmenu.
Typically, I keep a particular application associated with each desktop like the following. This allows switching between unrelated applications like emacs and slack very quickly.
| Desktop | Entry |
|---|---|
| q | browser |
| w | terminal |
| e | emacs |
| t | |
| u | book / pdf |
| i | slack |
| o | irc |
Keys
Pressing shift with any of these keys causes your current window to be moved to that desktop.
For example, 🗔-Shift-o moves the currently focused window to the o
desktop.
| Key | Action |
|---|---|
🗔-q |
Move to desktop #1 |
🗔-w |
Move to desktop #2 |
🗔-e |
Move to desktop #3 |
🗔-r |
Move to desktop #4 |
🗔-t |
Move to desktop #5 |
🗔-y |
Move to desktop #6 |
🗔-u |
Move to desktop #7 |
🗔-i |
Move to desktop #8 |
🗔-o |
Move to desktop #9 |
Windows
A desktop typically has one application (“window”), but more can be split into a number of adjacent windows, toggled between horizontal & vertical splits (as well as returned to full-screen configuration).
Windows each have ’focus’, which refers to which application recieved input when keys are pressed on the keyboard. Both position & window focus can be switched with the classic Vi HJKL keybindings described below.
Keys
Pressing shift with any of these keys causes your currently focused window to be swapped with the window in the direction you specified.
For example, 🗔-Shift-o moves the currently focused window to the o
desktop.
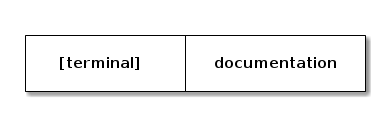
For example, this is a desktop that begins with a window ’documentation’ and
a focused window ’terminal’ (indicated by [ and ])
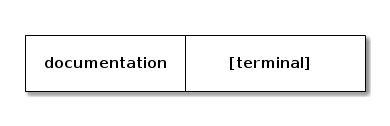
Pressing 🗔-Shift-h swaps their position.
| Key | Action |
|---|---|
🗔-l |
Switch focus to left window |
🗔-h |
Switch focus to right window |
🗔-j |
Switch focus to upper window |
🗔-k |
Switch focus to lower window |
🗔-m |
Toggle horiz/vert split |
🗔-n |
Maximize window |
🗔-c |
Close window |
Other
The most important final key is 🗔-p which runs dmenu.
dmenu (“dynamic menu”) autocompletes system binaries and invokes them when ⏎ is hit.
If I wanted to spawn google-chrome, I might type in goo and dmenu would
show something like the following.

I could hit ⏎ (return) and Chrome would start, I could also select other binaries with left/right keys as well.
Keys
| Key | Action |
🗔-p |
Run dmenu |
🗔-z |
Reload configuration |
🗔-⏎ |
Open terminal |
Comments
You can add a comment to this page by writing one on it's Github Issue Page